. Diberdayakan oleh Blogger.

Facebook

Best Cinema 4D Free Tutorial Sites

There'n many tutorial you can get on internet. Of course you can easily find it on google. Or maybe just search it on Youtube or Vimeo. Then you will find tons of tutorial there. But now, I'll make it easy for you to find them.
Here best sites for Cinema 4D tutorials that I know and I use for training :

GREYSCALEGORILLA.com


The owner of this site is Nick with his team: Chris Schmidt, Danny Schmidt, Dave Kiss, and Jacqueline Mueller.
This site has been growing with over Two Hundred Cinema 4D tutorials over the last five years. Check out the collection of growing tutorials about motion graphics and lighting or watch some of the large tutorials where Nick and friend show how to go from Cinema 4D to After Effects.

HELLOLUXX.com


Speaking of Tim, his site HelloLuxx has been pivitol in my understanding of Cinema 4D over the years. His site is one of the only �Designer Based� Cinema 4D sites out there. If you need Cinema 4D training for broadcast graphics work, this is your place. No spinning 3D monsters here.
Here you�ll find a compilation of free Cinema 4D tutorials (plus some After Effects too) from the blog. If you are looking for a deeper learning experience, you can check out the training collection - a selection of Cinema 4D Training and Houdini, expert classes, from some of the best professionals out there. There are currently over 50 free tutorials in that section, affectionately known as Tim�s Tips. The free tutorial section is constantly expanding so check back in regularly.

CINEMA4DTUTORIAL.net


Here you can find various of Cinema 4D and After Effects tutorials for visual effects. Also there you can get Cinema 4D templates and some of free 3D model.

CINEVERSITY.com


This is Cinema 4D Tutorial and Resources site. You can find reference videos, tips, project tutorials, presets and plugins for Cinema 4D here. For the free account, you can get hundreds of tutorials, browse and search the forum, and view shared playlists.

Best Cinema 4D C4D Free Tutorial Training Sites

Situs terbaik gratis Cinema 4D

Cinema 4D Tutorial - Modeling Cute Poop (Feces) - Ice Cream Style

This post is my first tutorial of Cinema 4D. Now we want to make or modelling a cute poop style (although it does not seem cute).


- Make your new Project.


- Add a "Helix".


- Set the Object Properties of the "Helix" like below (can be customized).


-  Add a "Circle".


- Change the Radius of the "Circle"(can be customized).


- Add a "Sweep".


- Set the "Helix" and the "Circle" as Children of the "Sweep".


-Set Details Scale of the "Sweep" like below (can be customized).


- Make the material (can be customized), then apply it to the "Sweep".


- Set the texture projection to "Cubic".


Poop Bakery

Poop Friend


Apologize for my bad English.
Thanks you for visiting.

sss
^_^

Tutorial Cinema 4D C4D Poop Model Modelling Free Ice Cream

Cinema 4D Tutorial - Modeling dan Rendering Bantal


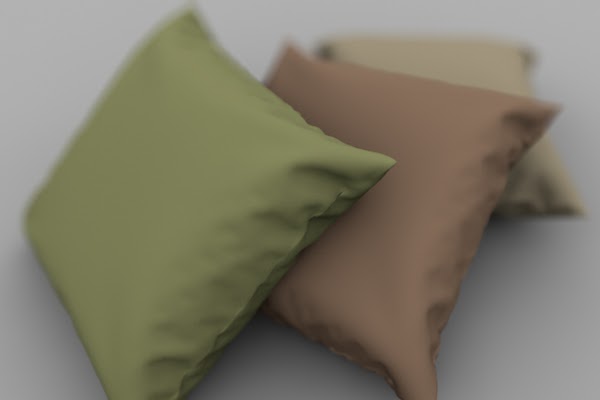
Pada tutorial kali ini, kita akan melihat teknik yang dibutuhkan untuk membuat (modeling) bantal dengan cinema 4D. Kemudian setelah membuat bentuk dan mengaplikasikan material/tekstur, kita akan mencoba menggunakan sistem "Advanced Render" untuk menambahkan depth of field (DOF) pada final render.


Download File

Langkah 1
Buatlah "Cube" (Kubus) dengan ukuran 760cm � 280cm � 760cm dengan pembagian segmen 50 � 1 � 50.


Langkah 2
Buat objek dapat diedit ("Edited") dengan shortcut "C", kemudian pilih "Loop Selection" pada tab "Selection"
 .


Langkah 3
Pilih semua permukaan sisi pada objek kubus dengan mengklik salah satu sisi poligon.


Langkah 4
Tambahkan "Cloth" tag pada "Cube" tersebut dengan klik kanan namanya pada tab"Objects", dan pilih seperti gambar di bawah.


Langkah 5
Setelah memilih tag "Cloth", beralih ke tab "Dresser" dan centang "Dress Mode". Kemudian ubah "Relax" dan "Dress-O-matic" masing-masing menjadi "35" dan "Width" menjadi "5 cm". Kemudian tekan tombol "Set" pada baris "Seam Polys".


Langkah 6
Sekarang klik tombok "Dress-O-matic" untuk membuat C4D otomatis membuat bentuk bantal dasar.


Langkah 7
Sekarang masuk dan hapus tag "Cloth" yang sebelumnya ditambahkan ke objek "Cube", jadi pilih tag "Cloth" tersebut dan tekan backspace pada keyboard.


Langkah 8
Dengan objek "Cube" terpilih, kemudian pilih tab "Character" > "Cloth NURBS". Drag objek "Cube" ke objek "Cloth NURBS" sehingga "Cube" menjadi "Child" dari "Cloth NURBS".


Langkah 9
Sekarang buat material baru, dengan cara "File" > "New Material" di tab Materials atau dobel klik di dalam jendela material


Langkah 10
Klik pada "Color" dan pilih warna untuk bantal sesuai yang diinginkan. Kemudian klik "Ok" untuk konfirmasi.


Langkah 11
Dari pilihan dasar, nyalakan "Bump" dengan mencentang checkbox dari "Bump".


Langkah 12
Pada tab "Bump" klik panah "Tekstur"kemudian pilih "Surfaces" > "Simple Noise".


Langkah 13
Klik pada teks "Simple Noise" untuk mengakses properti shader.


Langkah 14
Mengatur nilai freuensi U dan V menjadi "40".


Langkah 15
Klik tombol kembali di atas material editor untuk kembali ke pengaturan "Noise".


Langkah 16
Ubahlah "Blur offset" menjadi "1 %".


Langkah 17
Sekarang drag dan drop material baru tersebut dari tab material ke objek bantal di viewport.


Langkah 18
Selanjutnya membuat lingkungan untuk bantal-bantal tersebut. Pertama membuat objek "Floor" (Lantai).


Langkah 19
Kemudian tambahkan objek "Sky" (Langit).


Langkah 20
Buka jendela "Render Settings".


Langkah 21
Klik pada tombol "Effect" dan tambahkan "Global illumination". Ulangi lagi untuk menambahkan "Depth of Field".


Langkah 22
Pada tab seting "Depth of Field", ubahlah "Blur Strength" menjadi 15%. Sekarang kita bisa menutup jendela "Render Settings".


Langkah 23
Sekarang adalah waktu untuk membuat scene yang sedikit lebih menarik. Buat beberapa salinan/copy dari objek "Cloth NURBS" dan atur posisi-posisinya kira-kira seperti gambar di bawah. Juga dapat membuat salinan material yang berbeda sehingga masing-masing bantal memiliki warna berbeda.


Langkah 24
Tambahkan objek "Camera".


Langkah 25
Pilih Kamera tersebut, dan pada tab "Depth" centang "Front Blur" dan "Rear Blur".


Langkah 26
Beralih ke "Right view" (Tekan F3). Untuk mengatur titik fokus dapat dilakukan dengan menggeser titik pada pusat persegi sesuai dengan jarak fokus yang diinginkan.


Langkah 27
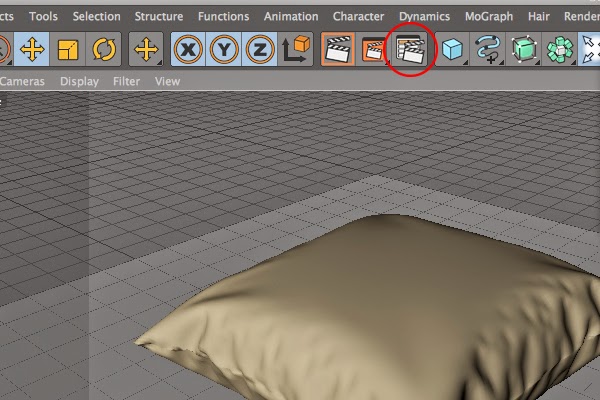
Kita sekarang perlu mengatur kamera sebagai kamera utama, "Cameras" > "Scene Cameras" > "Camera".


Langkah 28
Klik tombol render untuk melihat hasil akhir.


Langkah 29
Setelah rendering selesai, gunakan aplikasi photo/gambar editing seperti Photoshop untuk memperbaiki hasil render tersebut.


Quick Tip : Modelling and Rendering a Pillow in C4D
Source : cgi.tutsplus.com
Cinema 4D Tutorial Bahasa Indonesia Gratis Free 3D Modeling Membuat Bantal

Cinema 4D Tutorial - Modeling Cute Poop (Kotoran yang Imut dan Lucu)

Ini adalah tutorial Cinema 4D saya yang pertama. Tentunya ini adalah tutorial yang sangat sederhana. Kali ini kita akan membuat (modelling) sebuah t*i/ kotoran yang lucu (cute poop).

Click for English Version


- Buatlah sebuah Project baru.


- Tambahkan sebuah "Helix".


- Aturlah Object Properties dari "Helix" seperti contoh gambar di bawah (sesuaikan).


- Tambahkan sebuah "Circle".


- Ubahlah ukuran Radius dari "Circle" tersebut (sesuaikan).


- Tambahkan sebuah "Sweep".


- Aturlah agar "Helix" dan "Circle" sebagai Children dari "Sweep".


-Aturlah Details Scale dari "Sweep" tersebut seperti gambar di bawah (sesuaikan).


- Buatlah sebuah material (sesuaikan), kemudian aplikasikan pada "Sweep".


- Aturlah agar projection dari texture tersebut menjadi "Cubic".


Terima Kasih Telah Berkunjung.

sss
^_^

Tutorial Cinema 4D C4D modelling poop kotoran gratis free