
Finally, after some time I dream, I can buy the tools and stuff that I need to make a simple home recording. Of course, armed only with simple products from Behringer at a price that can only be purchased with the results of some of my savings this year.
For the mic, I use a condensor mic C-1. Surely a condensor mic that requires phantom power can be used. But with the 1202FX XENYX mixer, mic C-1 can be directly plugged in and used as a mixer has been equipped with its own preamp and phantom power. Thus no longer need to buy a preamp and phantom power or separately to be able to use this mic.
For recording, certainly not enough to rely solely on the mainboard simple soundcard of a PC. Because it would need an audio interface. And in this case, I rely FCA202 as a bridge between the mixer and my computer. It's just that for me was less than the audio interface is not the availability of drivers for Windows 64-bit. Premises so that forced me to invite my computer to do a dual boot ambiguous in order to play with Windows 32-bit.
Here are some advantages and disadvantages that I see from the tools of my simple home recording:
STUDIO CONDENSER MICROPHONE C-1
 Advantages :
? Ultra-low noise
? Lightweight
? Suitable for use vocal or instrument signal capture (such as guitar, piano, etc.)
Disadvantages :
-
XENYX 1202FX
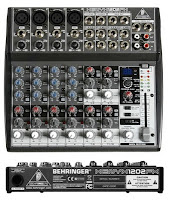 Advantages :
? The price is cheap
? Portable mixer with minimal size
? Very easy to use
? Premiun ultra-low noise
? XENYX Mic Preamp 4 are equipped with phantom power (+48 V) which can be used directly with a condensor mic
? 3-band EQ
? 24-bit/96 kHz for high-end audio quality
? Ultra-low latency for use with Windows XP, Vista, 7 (32-bit) and Mac OS X
? Equipped with 100 24-bit FX such as reverb, chorus, flanger, delay, pitch shifter and various multi-effects.
Disadvantages :
? Do not have a power button.
? Light lights (power light) that is too bright so little disturbing.
? The bottom does not have rubber feet.
F-CONTROL AUDIO FCA202
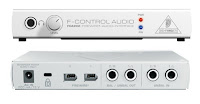 Advantages :
? audiophile FireWire interface connects your instruments, mixer, etc. with your computer for recording and playback
? It is a high-resolution converters with 24-bit bit depth and sample rate up to 96 kHz for the audio quality of high-end
? Ultra-low latency operation under Windows XP, Vista, 7 (32-bit) and Mac OS X
? Stereo Headphone output with dedicated control rate
? Double FireWire connectors with high bandwidth speeds
? Direct use as a PC FireWire bus power (to 6-pin) or with an adapter (for 4-pin)
? Includes standard port for locking
Disadvantages:
? Non-availability of drivers for Windows 64 bit [: (]
Website Behringer:
STUDIO CONDENSER MICROPHONE C-1
XENYX 1202FX
F-CONTROL AUDIO FCA202
For recording, certainly not enough to rely solely on the mainboard simple soundcard of a PC. Because it would need an audio interface. And in this case, I rely FCA202 as a bridge between the mixer and my computer. It's just that for me was less than the audio interface is not the availability of drivers for Windows 64-bit. Premises so that forced me to invite my computer to do a dual boot ambiguous in order to play with Windows 32-bit.
Here are some advantages and disadvantages that I see from the tools of my simple home recording:
STUDIO CONDENSER MICROPHONE C-1

? Ultra-low noise
? Lightweight
? Suitable for use vocal or instrument signal capture (such as guitar, piano, etc.)
Disadvantages :
-
XENYX 1202FX
 Advantages :
 ? The price is cheap
? Portable mixer with minimal size
? Very easy to use
? Premiun ultra-low noise
? XENYX Mic Preamp 4 are equipped with phantom power (+48 V) which can be used directly with a condensor mic
? 3-band EQ
? 24-bit/96 kHz for high-end audio quality
? Ultra-low latency for use with Windows XP, Vista, 7 (32-bit) and Mac OS X
? Equipped with 100 24-bit FX such as reverb, chorus, flanger, delay, pitch shifter and various multi-effects.
Disadvantages :
? Do not have a power button.
? Light lights (power light) that is too bright so little disturbing.
? The bottom does not have rubber feet.
F-CONTROL AUDIO FCA202
 Advantages :
 ? audiophile FireWire interface connects your instruments, mixer, etc. with your computer for recording and playback
? It is a high-resolution converters with 24-bit bit depth and sample rate up to 96 kHz for the audio quality of high-end
? Ultra-low latency operation under Windows XP, Vista, 7 (32-bit) and Mac OS X
? Stereo Headphone output with dedicated control rate
? Double FireWire connectors with high bandwidth speeds
? Direct use as a PC FireWire bus power (to 6-pin) or with an adapter (for 4-pin)
? Includes standard port for locking
Disadvantages:
? Non-availability of drivers for Windows 64 bit [: (]
Website Behringer:
STUDIO CONDENSER MICROPHONE C-1
XENYX 1202FX
F-CONTROL AUDIO FCA202


.jpg)
.jpg)
.jpg)
.jpg)


